A compact engraving pen and mini rotary tool is built for controlled, small-area work—fine lines, clean edges, and careful finishing on everyday craft and hobby materials. With a pen-style grip and a broad mix of precision bits, it’s a practical option for personalizing gifts, touching up small repairs, smoothing rough cuts, and polishing tiny parts without hauling out larger tools.
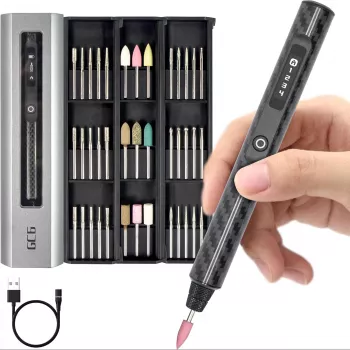
If you want a ready-to-go kit for detailing, consider the Smart Engraving Pen & Mini Rotary Tool with 39 Precision Bits for quick switching between engraving, sanding, and polishing steps.
This style of mini rotary tool shines when the goal is finesse—small adjustments, clean finishes, and readable lettering—rather than heavy stock removal. It’s especially handy for jobs like smoothing a sharp edge on a 3D print, touching up a nick in a metal part, or adding a name to a keychain or ornament.
A multi-bit set supports the full workflow: mark, shape, smooth, and finish. The biggest advantage of having many accessory options isn’t just variety—it’s control. Choosing the correct bit for the job helps reduce skipping, chatter, and accidental gouges (a common issue on soft woods, plastics, and resin).
For faster setup, sort accessories by job type (engrave, grind, sand, polish). It keeps the work consistent and reduces the temptation to “make do” with the wrong attachment.
| Bit type | Best for | Tip for cleaner results |
|---|---|---|
| Engraving tips (fine) | Lettering, outlines, small icons | Use light pressure and make multiple passes instead of one deep cut |
| Grinding/shaping bits | Deburring edges, refining small parts | Stabilize the workpiece to prevent grabbing |
| Sanding drums/discs | Smoothing, edge blending, paint prep | Start with finer grit for plastics to avoid melting |
| Polishing bits | Shine on metals, acrylic edges, resin | Use a gentle touch and keep moving to avoid heat spots |
| Cutting/abrasive wheels (if included) | Small trimming tasks on suitable materials | Wear eye protection; keep the wheel square to the surface |
For best results, match expectations to the tool’s strengths: crisp details and tidy finishes. If a project involves thick metal cutting or large-area grinding, a heavier-duty rotary tool is typically a better fit, while a mini engraving pen remains ideal for the final detailing steps.
A steady setup matters as much as the bit choice. A small wobble at the workpiece becomes a visible “wave” in lettering, and it also increases the chance of a bit catching and jumping out of the line.
A simple organization routine helps: keep engraving tips protected, keep sanding pieces grouped by grit, and set aside “used but OK” polishers for rougher work. If hands tend to fatigue during longer sessions, consider adding ergonomic habits from Hands at Ease: Stop Mouse Pain Fast—the same wrist and grip principles apply to detailed tool work.
A tidy bench reduces mistakes. If accessories and small parts tend to migrate, a simple organization plan can make setup faster and safer; Clear & Cozy: Smart Ideas for Tackling Living Room Clutter can be adapted into a “craft corner” system for bits, stencils, and small clamps.
They commonly handle wood, plastic, acrylic, resin, and light work on softer metals, plus careful etching on glass or ceramics with the correct bit. Test on a scrap piece first to confirm how the material responds, since hardness and coatings can change results.
Outline the design first, use light pressure, and make multiple shallow passes instead of one deep cut. Bracing your hand and finishing with a gentle sanding or polish helps remove raised burrs and sharp edges.
Polishing won’t remove deeper sanding scratches; step back to a finer grit sanding stage, then polish again. Keep the tool moving with a light touch to reduce heat haze, especially on acrylic and plastics.





Leave a comment